Tuesday, January 30, 2018

Honda Valve Clearance Adjustment with HDS

Question: Have you found the Honda tutorial for valve adjustment?
Solution: Yes, please check the guide below:

NOTE: Connect the Honda HDS HIM diagnostic system to the DLC, and monitor ECT SENSOR 1. Adjust the valve clearance only when the engine coolant temperature is less than 100 °F (38 °C).


1.Remove the cylinder head covers.


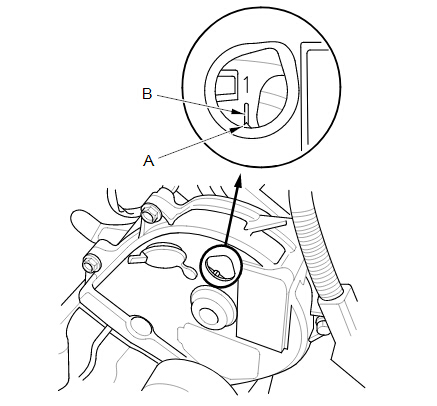
2.Set the No. 1 piston at top dead center (TDC). Align the pointer (A) on the front upper cover with the
No. 1 piston TDC mark (B) on the front camshaft pulley.
honda-value-adjustment-1


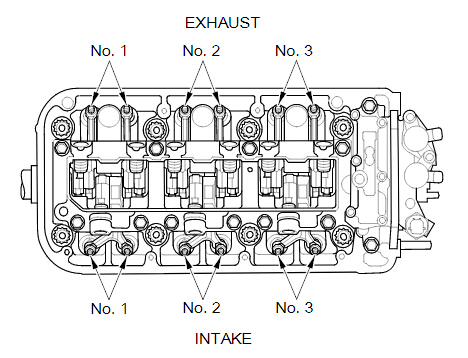
3.Select the correct feeler gauge for the valve clearance you are going to check.


Valve Clearance


Intake:

0.20-0.24 mm (0.008-0.009 in)


Exhaust:

0.28-0.32 mm (0.011-0.012 in)


REAR

honda-value-adjustment-2
FRONT

honda-value-adjustment-3
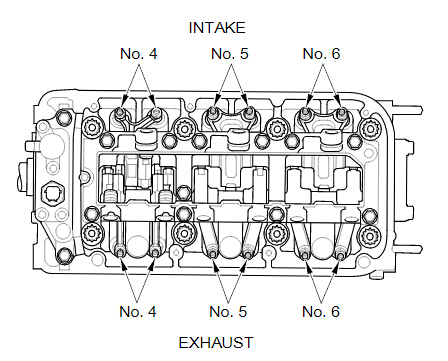
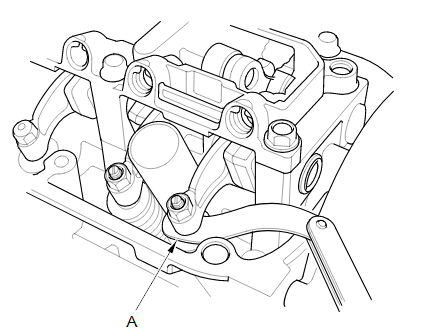
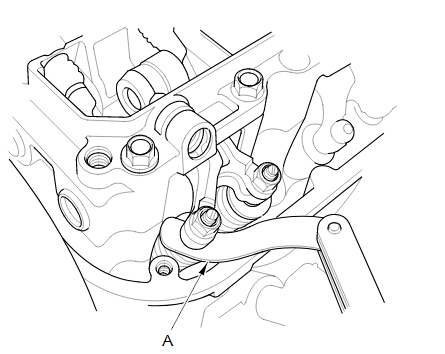
4.Insert the feeler gauge (A) between the adjusting screw and the end of the valve stem on the No. 1 cylinder, and slide it back and forth; you should feel a slight amount of drag.

INTAKE

honda-value-adjustment-4

EXHAUST


honda-value-adjustment-5
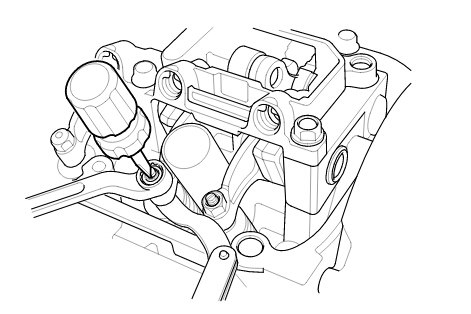
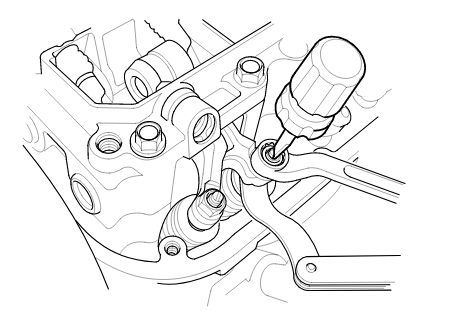
5.If you feel too much or too little drag, loosen the locknut, and turn the adjusting screw until the drag on the feeler gauge is correct.

INTAKE
honda-value-adjustment-6
EXHAUST

honda-value-adjustment-7
6.While holding the adjusting screw with the screw driver, tighten the locknut, then recheck the clearance. Repeat the adjustment, if necessary.


Specified Torque


No. 1, No. 2, No. 3, and No. 4 cylinders:


20 N·m (2.0 kgf·m, 15 lbf·ft)


Apply new engine oil to the nut threads.


No. 5 and No. 6 cylinders:


14 N·m (1.4 kgf·m, 10 lbf·ft)


Apply new engine oil to the nut threads.


7. Rotate the crankshaft clockwise. Align the pointer (A) on the front upper cover with the No. 4 piston TDC mark (B) on the front camshaft pulley.
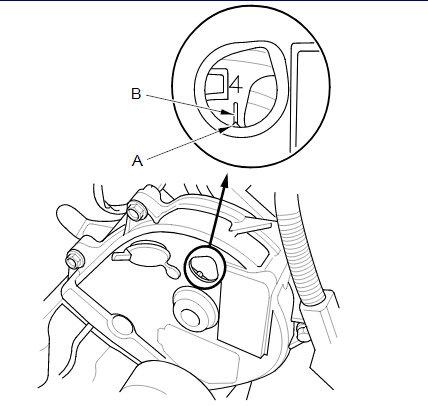
honda-value-adjustment-8

8.Check and, if necessary, adjust the valve clearance on the No. 4 cylinder.


9.Rotate the crankshaft clockwise. Align the pointer (A) on the front upper cover with the No. 2 piston TDC mark (B) on the front camshaft pulley.
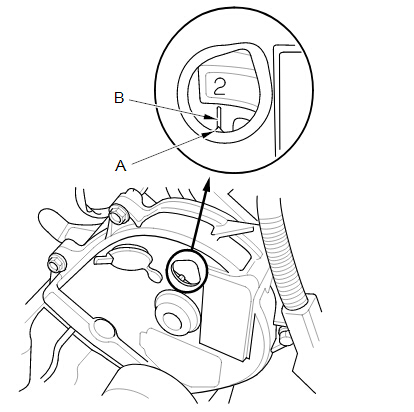

honda-value-adjustment-9

10.Check and, if necessary, adjust the valve clearance on the No. 2 cylinder.


11.Rotate the crankshaft clockwise. Align the pointer (A) on the front upper cover with the No. 5 piston TDC mark (B) on the front camshaft pulley.
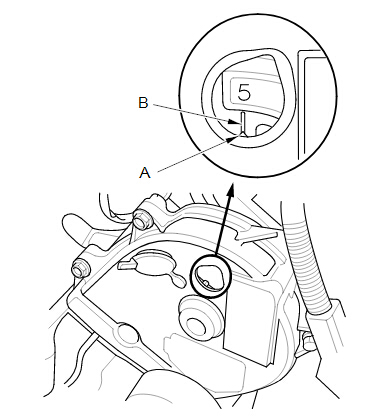

honda-value-adjustment-10
12.Check and, if necessary, adjust the valve clearance on the No. 5 cylinder.


13.Rotate the crankshaft clockwise. Align the pointer (A) on the front upper cover with the No. 3 piston TDC mark (B) on the front camshaft pulley.
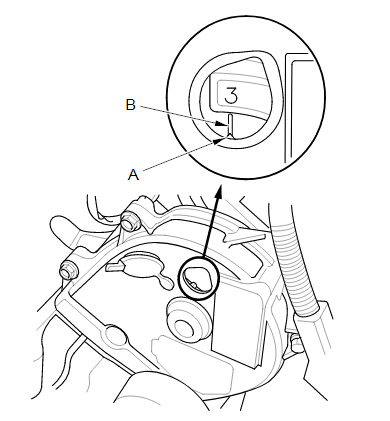

honda-value-adjustment-11
14.Check and, if necessary, adjust the valve clearance on the No. 3 cylinder.


15.Rotate the crankshaft clockwise. Align the pointer (A) on the front upper cover with the No. 6 piston TDC mark (B) on the front camshaft pulley.
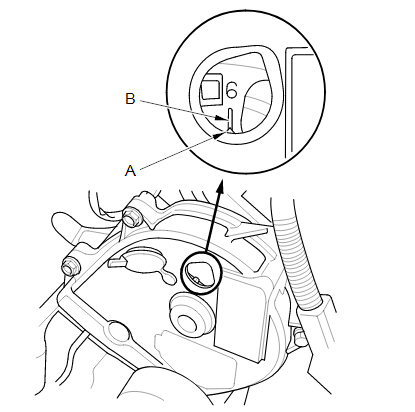

honda-value-adjustment-12
16.Check and, if necessary, adjust the valve clearance on the No. 6 cylinder.


17. Install the cylinder head covers.

Tuesday, December 19, 2017

How to use Honda HDS HIM to make a DPF forced regeneration

Here's the step-by-step guide to use Honda HDS HIM diagnostic system to make a DPF (Diesel Particulate Filters) forced regeneration by yourself.


Preparation:

Firstly, you have to buy HIM interface and a laptop:

honda-hds-him-scanner

The link to the page where I buy it (84.99USD free shipping) Honda Diagnostic System with double-board. Comes with the HDS software (V3.102.004 I think).

Honda interface connects to the PC only via a Com port (RS232), so if your laptop does not have a COM port, you will need an adapter.

I recommend it -> High Quality Z-TEK USB1.1 to RS232 Convert Connector. It has the advantage of being fully compatible with Windows 7 64bit and it works without problem.
z-tek-usb-to-rs232-cable
You are now in possession of professional cheap tool that can be used on all our Civic 8)

The DPF forced regeneration:

When performing this?
When you are in degraded mode or with the message "Check system", or if like me, you regenerations too close and you want to limit the damage before it is too late.

Small extra info before starting:

- Make sure you have a PC laptop preferably holding the charge for use 1H or desktop PC on UPS to avoid power cut during the operation.

- The operation takes about 30min. So either you stay in the car while time is still on or off with the PC: not to go back in the car during the regeneration, avoids interactions with it to avoid problems.

- If you use an adapter Com (232) -> USB, verify that the com port is set to COM1. The interface does not work on another COM port!

- Check the oil level before and after regen. If after regen, the oil level is too high or if it stinks diesel will require draining.

- Disable the energy saving usb, antivirus, internet and all that can use PC resources.


Honda HDS forced regeneration operation:

On this, I appeal to my memory, because I was a bit stressed during the manip and I also fear that my PC crashes battery.

Let's go:

1) Make a nice little tricks with the car to make the 76 ° or at least not too far

2) Put themselves in a place where noise motors can interfere people and nothing can come under the car. (The DPF rises above 600 ° C)

3) Open the hood

4) Disable all that pump energy (ceiling, etc ...) and especially not fun to reactivate during operation.

5) Connect the HIM to the car and the computer.

6) Start the HDS

7) Turn the ignition on II

8) In the HDS, press the "Select a new vehicle" and enter the mileage.

honda-hds-pdf-regen-1

9) Select "System"

10) Select "Diesel"

honda-hds-pdf-regen-2
11) Check and delete the DTC menu "DTC - given frozen". The HDS warn you it is absolutely necessary to remove them before operation and also check the various sensors of the DPF, so if you have a problem with sensors, do not bother going any further.

12) and go back to "Settings"

honda-hds-pdf-regen-3
13) Select "DPF Regeneration"

honda-hds-pdf-regen-4
14) Put the engine running, turn on the lights and put on the air conditioner ON

15) If the engine is not the right temp, the HDS asked to accelerate between 1600 and 2400trs/min

16) When the temp is reached, the HDS takes over, release the accelerator.

17) Allow the Honda HDS to regeneration. The engine mounts alone at 3000trs/min during regeneration, it is stagnant at 1500 trs/min. At the end of the regeneration scheme dates back to 3000 trs/min to cool the exhaust line (weird, but it is like here)

honda-hds-pdf-regen-5
19) When the regeneration is complete, leave the HDS, turn off the engine, remove the cables from HIM and go for a ride to make sure the cooling line.


That is, your regeneration is done and you win a lot of money doing it yourself.


www.obdii365.com

Honda HDS HIM Memorize Honda Civic 08 TPMS sensor ID

I bought my Honda HDS HIM clone months ago so I thought I would do a bit of a review.
So if you don’t know there are all kinds of clones of Honda’s HDS HIM diagnostic system out there on the Internets. I made a leap of faith and picked one up on obdii365.com about two month ago to reprogram my TPMS sensors (I hate you Honda for this TPMS crap system). I was hesitant because it did not state that it supported my 2011 Fit. The cracked HDS software version that came with it did not cover my car, but I was able to find a newer version (V2.024.05) on the internet that worked. I have successfully used the TPMS features, CKP relearn, idle relearn, ECU reset, and cleared DTS faults. I belive this thing can data log, reprogram gauge clusters, and reprogram the immobilizer for new keys, but have not tried these things yet.
It came with various connectors for self-verification testing too.
So the HDS only has a RS232 DB9 serial port (no usb),and most laptops don’t have them anymore. The adaptor will plug into your laptops usb and replicate a RS232 port. You will probably need a RS232 to USB adapter too. I have always had good luck with FTDI adapters. Future Technology Devices Intl – UC232R-10 The HDS will only connect to com port 1. So you may have to change your com port assigned number when you use a usb adapter. I have only used the Honda HDS on a windows XP laptop so I cannot confirm this works on newer Windows.
Here is another possible option I have not tried yet, but would love to because it is much cheaper and uses USB! Looks like it uses the same HDS software!
And if you are going to do TPMS you might want to look at triggering tools, if not you have to deflate and re-inflate a wheel to trigger the sensor. Our TPMS sensors only only transmit when they are spinning over ~26MPH, detect a rapid pressure change, or are triggered with a 125Mhz signal. I bought the trigger tool. It’s Foxwell made: http://www.obdii365.com/wholesale/foxwell-nt1001-tpms-trigger-tool.html
Overall this is a very powerful tool that lets you do about everything the dealer can!
The factory service manual pretty much explains how to use the HDS in all of Honda’s trouble shooting procedures. All of the things I have used have matched up, like TPMS and CKP relearn.
This is how i used Honda HDS HIM to Memorize Honda Civic 2008 TPMS sensor ID
NOTE:  make the vehicle sit for at least 5 minutes to allow the tire
pressure sensors to switch to sleep mode. The vehicle with the new
tire sensor must be at least 10 ft (3m) away from other vehicles
that have sensors.
Step1: Connect the Honda diagnostic system with vehicle via OBD
port on the driver’s side under the dashboard.
Step2: Turn ignition ON.
Step3: Make sure Honda HIM HDS Diagnostic Toolis well communicated
with TPMS control module.
Step4: Enter vehicle information in HDS program.
honda-hds-memorize-tpms-id-1
Step5: Select “Honda Systems” from Mode selection menu
honda-hds-memorize-tpms-id-2
Step6: Select“TPMS” control module
honda-hds-memorize-tpms-id-3
Step7: Select “Sensor ID Learning” from the Mode menu
honda-hds-memorize-tpms-id-4
Step 8: The Honda HDS software will display Tire pressure sensor
ID, follow the screen prompt to turn on the TPMS Trigger Tool.
honda-hds-memorize-tpms-id-5
Step9: Hold the TPMS tool (A) near the valve stem of one wheel, and
memorize the tire pressure sensor ID by following the screen prompts
on the HDS. (If you turn the ignition OFF before memorizing all
four sensor IDs, the memorizing sensor ID will be canceled.)
Step10: Write down the 4 tire pressure sensor IDs.
Step11: Exit the Honda HDS software and disconnect Honda HIM tool.
Job’s done!
Here are a few more things it claims to do:
Honda functions include:
  • DTC reading and clearing
  • Snapshot function (capture data relative to a trigger event)
  • Vehicle data display (value, line graph, or bar graph formats)
  • DLC locator diagrams
  • Data list display (real-time display of ECU parameters)
  • Onboard tutorial
  • Generic scan tool runs basic tests on non-Honda/Acura vehicles (HDS Tablet and Pocket Tester only)
  • Control module update functions (HDS Tablet and Pocket Tester only)


Friday, October 27, 2017

Honda Diagnostic System HDS HIM Self-Test Guide

How to check if your Honda HDS HIM diagnostic tool works good or not?
You need have self test on Honda HIM Honda diagnostic system .

Here is the how-to’s.

1 Attach the DLC loopback connector to be the end of the vehicle DLC cable on the Honda HIM diagnostic tool
2 Attach the RS232 loopback connector (part of your PGM Tester equipment)) on the HIM
honda-hds-him-self-test-1
3 Connect the PGM Tester Adapter to the POWER socket on Honda HDS HIM device
honda-hds-him-self-test-2
honda-hds-him-self-test-3
honda-hds-him-self-test-4
4 The green LED flashes for 5 seconds
honda-hds-him-self-test-5
5 The green LED continues to flash and the yellow LED glows steadily
Press Enter button the HIM
honda-hds-him-self-test-6
honda-hds-him-self-test-7
6 The green, yellow, red LEDs flash alternately for 15 seconds
honda-hds-him-self-test-8
honda-hds-him-self-test-9
honda-hds-him-self-test-10
7 The green and yellow LED flash alternately.
honda-hds-him-self-test-11
honda-hds-him-self-test-12
8 Disconnect the DLC loopback connector, then press the Enter button
honda-hds-him-self-test-13
9 The green, yellow and red LEDs flash alternately for 15 seconds

10 When Honda HIM self test is complete, and the HIM hardware is confirmed OK, then green LED glows steadily.
honda-hds-him-self-test-14
Job’s done.

Wednesday, October 25, 2017

How to Turn ON/OFF Honda Service Reminder System with HDS

Here's the detail definition of service reminder system and how to turn on/off with Honda diagnostic System HDS HIM.

Service Reminder System
The Service Reminder System is an important feature of the multi-information display. Based on engine operating conditions, the NSX's onboard computer (PCM)calculates the remaining engine oil life. The system also shows the Service Reminder Information Display along with the code(s) for other scheduled maintenance items needing service.

NOTE: If the vehicle was under some situations where the power was not supplied for a long period of time such as having a 12 volt battery run out, connect the HDS to the vehicle. If not, the Maintenance Schedule may not be displayed with.


Applicable Countries

The Service Reminder System will not be applied for all the EU countries. Confirm the countries where the system is applied. The system is not active in default setting. The system needs to be activated by HDS at Honda/Acura dealer. If the vehicle is taken to outside of the applicable countries, apply the maintenance schedule for non-applicable countries.

NOTE: If you turn the Service Reminder System OFF after the first activation, it cannot be reactivated. When one month or more passes after disconnecting 12 volt battery terminal, set the date on Service Reminder System with HDS.


How to turn ON/OFF Service Reminder System with HDS
1. Connect the Honda HDS HIM to the data link connector (DLC). 

2. Turn the vehicle to the ON mode.

NOTE: Make sure the HDS communicates with the vehicle. If it does not communicate, go to the DLC circuit troubleshooting.

3. Select GAUGES from the BODY ELECTRICAL system select MENU with the HDS.

4. Select ADJUSTMENT, then select SERVICE REMINDER.

5. Select SETTING, then ON/OFF the Service Reminder System.


Service Reminder Information

1. The Service Reminder Information Display is shown on the multi-information display. When the vehicle is in ON mode, and the remaining days are more than 30 days, the display shows a warning symbol (A), the maintenance item(s) (B), and remaining days (C).

How to access to the Service Reminder Information Display
  • Turn the vehicle to the ON mode.
  • Roll the right multi-function steering wheel controller until the Service Reminder Information Display appears.

NOTE:
  • Required maintenance item code(s) are shown on Service Reminder Information Display. Complete list of maintenance item(s).
  • Depending on the client's driving condition, the remaining distance may not be always in agreement with the mileage in the odometer.
2. When the vehicle is in ON mode, and the remaining days are within 29 to 10 days, the maintenance service message "Service Due Soon" (A) is displayed. The message indicator (B) remains lit until the message is canceled. To cancel the message, press or roll the right multi-function steering wheel controller. The Service Reminder Information Display continues to show the warning symbol (C) and the remaining days (D) along with all the maintenance item(s) currently needing service. 


NOTE: The language used in the warning message can be changed into several languages. Refer to the Owner's Manual for details.

3. When the vehicle is in ON mode, and the remaining days are within 9 to 0 day, the maintenance service message "Service Due Now" (A) is displayed. The message indicator (B) remains lit until the message is cancelled. To cancel the message, press or roll the right multi-function steering wheel controller. The Service Reminder information Display continues to show the warning symbol (C) and the remaining days (D) along with the maintenance item(s) currently needing service.

4. If the indicated maintenance is not done, the "Service Overdue" message (A) appears along with total negative days (B), for example "-10," on the display. This means the indicated maintenance item(s) should have been done more than 10 days ago. The message indicator (C) remains lit until the indicated maintenance is done. The Service Reminder information Display continues to show the warning symbol (D) and the remaining days (E) along with the maintenance item(s) currently needing service.


Resetting Service Reminder Information Display


NOTE:
  • The vehicle must be stopped to reset the display.
  • If all required services are done and the display is not reset, or if the maintenance item(s) is reset without doing the service, the system will not show the proper maintenance timing. This can lead to serious mechanical problems because there will be no accurate record of the vehicle when the required maintenance is needed.
1. Turn the vehicle to the ON mode.

2. While the Service Reminder Information Display is shown on the multi-information display, press and hold the right multi-function steering wheel controller for 10 seconds or more to show the reset mode. To cancel the reset mode, select "Cancel" (A) by rolling the right multi-function steering wheel controller, then press it.


3. To reset the Service Reminder Information Display, select "All Due Items" (A) by rolling the right multi-function steering wheel controller, then press it.

NOTE: If you are resetting the display when the remaining days are more than 30 days, make sure any maintenance item(s) requiring service are done before resetting the display.


4. The remaining days left is reset and the “Reset completed” message appears. The screen goes back to the Service Reminder Information Display.


Resetting Individual Maintenance Item by HDS
1.Connect the Honda Diagnostic System  to the data link connector (DLC) located under the driver's side dashboard.

2. Turn the vehicle to ON mode.

3. Make sure the HDS communicates with the vehicle and PCM. If it does not communicate, troubleshoot the DLC circuit.

4. Select GAUGE in the BODY ELECTRICAL with the HDS.

5. Select ADJUSTMENT in GAUGE with the HDS.

6. Select SERVICE REMINDER in the ADJUSTMENT with the HDS.

7. Select RESET in the SERVICE REMINDER with the HDS.

8. Select the individual maintenance item you wish to reset with the HDS.

Thursday, June 22, 2017

Honda HDS 3.102.004 Tested OK with HIM Scanner


Hi to all! Honda HDS software 3.102.004 is tested successfully. And now it’s ready for use on Honda diagnostics.

Purpose: Honda HDS software 3.102.004 works or not?

Time: Jun. 23rd, 2017
Staff: professional technicians working for http://www.obdii365.com/

Software to test: Honda diagnostic system V3.102.044
honda hds download (download “HDS 3.102.004. iso” only and install) is available there if you need it)

Device to test with software: Honda HDS HIM scan tool
honda-hds-him
Laptop in the test: Windows 7 32 bit

Test functions & test result:
The technician test the functionality of basic OBD2 diagnostics of HDS 3.102, including fault codes, VIN reader, IMMO and ECU reprogramming. But sometimes you need luck with IMMO and ECU reprogramming.

  1. Functions supported by OBD-II Protocols…….OK
1) Mode $01 – Display system current parameters in digital form (up to 8 parameters at once);
2) Mode $02 – Display parameters of freeze frame;
3) Mode $03 – Read and decode of fault codes from control block? memory;
4) Mode $04 – Delete of fault codes (memory clearing);
5) Mode $05 – Display results of oxygen sensors;
6) Mode $06 – Display results of changeably controlled systems and components;
7) Mode $07 – Display results of constantly controlled systems and components;
8) Mode $08 – Manage xecutive devices;
9) Mode $09 – Display car identification info.
  1. Functions supported by Honda/Acura Protocols………..OK
1) Read and decode fault codes from control blocks memory
2) Delete fault codes
3) Display system current parameters in digital form
4) Display system current parameters in graphical form
5) Combine displaying of data

Test coverage:
Dynamical, Body, Chassis, ABS, SRS, Anti-theft, etc.

Test result:
Honda HDS 3.102 windows 7 is confirmed to work no issues. Now you can get it from http://www.obdii365.com/wholesale/honda-hds-him-diagnostic-tool-with-double-board.html to test Honda (1992-2016) for diagnostics with Honda interface module (abbr. HIM).
honda-hds-v3-102
The important note:
Honda HDS 3.102.044 windows  8, 10 maybe work; you can try it yourself and good luck.

Also, you can have a test on Denso DST-I, GNA600, j2534, MVCI 3 IN 1, cheap Xhorse HDS cable… No one but yourself can take responsibility if you break something

The author can in NO WAY be held liable or responsible if you mess up something / anything.

Thursday, June 15, 2017

Free Download Honda HIM HDS 3.102.004 for Win 8

06.2017 Honda diagnostic system updated! Here, download Honda HDS 3.102.004 i-HDS 1.003.003 on Mega:

Honda diagnostic system software version:
1. HDS 3.102.004
2. i-HDS 1.003.003
3. J2534 Rewrite 1.00.0013_20170417

What is HDS and I-HDS?
To diagnose newer cars, I-HDS is required. The interface is easier to use. So you need to install HDS first and I-HDS afterwards.

With HDS, you can get into the IMMO module, but you need a pin code to program. I DO NOT have a keygen for it.
With I-HDS, you CAN'T get into IMMO.
So if you need to get into IMMO, DON'T install I-HDS.

How to install the new Honda HDS/I-HDS?
1. Mount HDS .iso and Install
2. Mount iHDS .iso and Install
3. Mount J2534 Rewrite and Install
Done.

HDS 3.102.004 working
Honda HDS 3.102.004  1
Honda HDS 3.102.004  2
Honda HDS 3.102.004  3
i-HDS 1.003.003 working
i-HDS 1.003.003 1
i-HDS 1.003.003 2
i-HDS 1.003.003 3
Honda J2534 Rewrite 1.00.0013 working
honda-j2534-rewrite

Compatible hardware interface: Honda HDS HIM double-board or Xhorse MVCI (confirmed by obdii365.com engineer.)


Confirmed: CAN BUS
Confirmed: Dynamical, Body, Chassis, ABS, SRS, Anti-theft, etc. 
Confirmed: Honda/Acura from 1992 to 2017

Confirmed: Reading and decoding fault codes from control blocks memory
Confirmed: Deleting fault codes
Confirmed: Displays system current parameters in digital form
Confirmed: Combined displaying of data
Confirmed: Management of executive devices support j2534 path true
Confirmed: Re-program the Auto ECU
Confirmed: Reading VIN
Confirmed: Logs keeping - writing and keeping of digital parameters in memory
Confirmed: Special functions - changing of permissible settings of blocks, programming etc.